THE VIRTUAL PROCESS ART WORKSHOP
THE VIRTUAL PROCESS ART WORKSHOP is a virtual story time where we will enjoy process art methods!
In process art, the emphasis is on exploration. Participants are encouraged to explore a material, a technique, a color, etc at length. The activity is child focused and directed. You can encourage your child to explore by asking open-ended questions like, “What would happen if…”?
Participants will enjoy stories, create art work, and receive process art "take and make" activity bags!
Then, you can submit pictures of your work for a "Virtual Process Art Show" at the end of the program!
A new lesson will be posted every Thursday from July 9 - Aug 13. You can find the lessons here or on Social Media!
AUGUST 13:
Grab an artist apron and let’s get messy! Please listen along to Splatter written by Diane Alber for some painting inspiration before beginning our process art. Splatter - https://www.youtube.com/watch?v=UFSFz25XMSI
Grab an artist apron and let’s get messy! Please listen along to Splatter written by Diane Alber for some painting inspiration before beginning our process art. Splatter - https://www.youtube.com/watch?v=UFSFz25XMSI
- Today we will need a paint palette: disposable yogurt cups, or anything that you don’t mind mixing paint in. You will also need a large piece of white paper, water, a few pieces of sponge (feel free to cut a sponge into pieces since you will need a few small pieces), and of course, paint! Optional, but recommended, to use a wooden spoon or spatula – just for something to “splat” with.
- With the help of a family member, mix equal parts water and paint and place them into your paint palette. Repeat this water and paint mixture to as many colors as you would like.
- Next, place the pieces of sponges into the watered-down paint mixtures. Have one small piece of sponge for each color of paint on your palette.
- Now for the fun part! Place the pieces of sponge onto your piece of paper, wherever you would like the colors to be.
- The next part is artist’s choice! You can use the wooden spoon or spatula to smack the sponge. Watch what happens! Careful – the paint will splatter all over your paper (and maybe you)! You can also carefully toss the sponge onto the piece of paper to leave a splat on your paper. You could also get messy and squeeze the sponge in your hands and watch the paint drip onto your paper. Get creative – have fun – get messy!
AUGUST 6:
Hello Process Artists! Please listen along to Clem & Tang: Not Peeling So Well written by Darren Flowers and illustrated by Arooba Bilal to hear a tale of some fruity friends at Bottomless Blend. Here is the link: https://www.youtube.com/watch?v=e_JULXm7sxA
Today, we will be creating colorful citrus canvases!
1. Please collect the materials you will need for today’s Process Art. You will need white paper, a few colors of paint (I suggest fruity colors such as orange, yellow, and lime green), and whatever fruits you would like! For best results, I suggest using a lime, orange, lemon, and/or grapefruit.
2. With the help of a family member, please cut your fruits in half. Next, squeeze out all the good stuff (set aside for a later use, or dispose). You will want all juice and pulp pressed out completely. I also suggest parents use a paring knife to cut out the juice sacks, leaving only the citrus membranes intact. Next, use a paper towel to further dry out your citrus rinds.
3. We will be using these citrus rinds as stamps today. Carefully dip your fruits in your desired paints. Let the paint coat the rind and citrus membrane fully.
4. Gently press the rind onto your white paper. Slowly lift the rinds off the paper and see what designs are left behind from the stamp.
5. Notice the interesting patterns the citrus membrane leaves behind. Feel free to mix the colors, overlap your imprints, or just have fun with it!
6. For more of a sensory process art, feel free to skip the step of draining the fruits and leave them as is. This will be the messier option but quite fun! The citrus juice will mix with the paint for a waterier medium to work with.
Vitamin’C ya later!
JULY 30:
Here at Process Art, we love getting our hands messy – especially with glue! No matter how many works of art we create, or how many materials and mediums we use, one question always remains…is there a such thing as too much glue? Please listen along to Too Much Glue written by Jason Lefebvre and read by Allie Lamb to find out. Too Much Glue - https://www.youtube.com/watch?v=h7fJJSG7X_s
Here at Process Art, we love getting our hands messy – especially with glue! No matter how many works of art we create, or how many materials and mediums we use, one question always remains…is there a such thing as too much glue? Please listen along to Too Much Glue written by Jason Lefebvre and read by Allie Lamb to find out. Too Much Glue - https://www.youtube.com/watch?v=h7fJJSG7X_s
- For this project, you will need a small plastic container/tray. A plastic lid from a larger tub of yogurt works perfect but any recycled receptacle will work just fine! You will also need a variety of food coloring, toothpicks, and liquid glue.
- First, have a family member help pour out a layer of glue into the container or lid, just enough to fully cover the bottom. Keep in mind this particular process art will mainly be about the creative process rather than a masterpiece to hang on the refrigerator like we normally do (it’s okay if it does not dry – it’s about having fun!)
- Next, carefully dollop small drops of food coloring throughout the puddle of glue. Use however much or little you, the artist, would like!
- Now for the fun part! Use toothpicks to spread and mix the food coloring into the glue. Delicately drag the toothpick across the white glue, leaving vibrant swirls of color.
- Feel free to let this tray dry and keep – or keep making more glue paintings!
JULY 23:
For this week's Process Art Workshop, please read long to Arnie the Doughnut, written and illustrated by Laurie Keller. Here's a link to the story: https://www.youtube.com/watch?v=6E67n1vZZjQ
Now grab a snack – we’re about to create some tasty looking treats!
For this week's Process Art Workshop, please read long to Arnie the Doughnut, written and illustrated by Laurie Keller. Here's a link to the story: https://www.youtube.com/watch?v=6E67n1vZZjQ
Now grab a snack – we’re about to create some tasty looking treats!
- You will find a CD disk in your Take and Make bag – this will be our yummy donut! If you didn't register for a bag, just use a spare CD, DVD, or cut a circle out of cardboard box to create our own delicious donuts!
- Optional, if you have construction paper, have a family member help trace the CD disk and cut out one circle. Feel free to get creative and cut out icing drip designs along the outside of the construction paper circle. Use a glue stick or liquid glue and cover one side of the disk. Paste your "icing" paper cut out onto your CD disk.
- Go crazy! Use the foam shapes and sequins to decorate your dessert. If you have glitter, gem stones, or paint at home, add them if you like!
- Put aside the CD disk in order to fully dry – do-nut munch on this donut though!
With the approval of the Hamilton and Wenham Boards of Heath, we are offering "Take and Make" Bags for today's Process Art Lesson! The bags will contain all the materials you need for today's Process Art lesson. Bags will be available for pick-up by registration only at the Hamilton-Wenham Public Library while supplies last! Please note: The bags contain small parts, best for ages 3-8!
JULY 16:
As we all know, here at Process Art, we always like to reduce, reuse, & recycle! Using spare, unwanted, and discarded items and supplies for art is the best way to do just that! Please listen along to Garbage Barge, written by Jonah Winter, illustrated by Red Nose Studio to learn more about just how much garbage there is. You can find the link to the story here: Garbage Barge – https://www.youtube.com/watch?v=Xb3bXKAkeek
To help reduce, reuse and recycle, will be making 3D recycled collages!
- Collect unwanted discarded items around the house – egg cartons, plastic caps, aluminum tabs, cardboard pieces, straws, wrappers, paper towel rolls, bubble wrap, packaging peanuts, anything you can find!
- If needed, have a family member help clean the supplies before using them in your masterpiece.
- Once the supplies are dry, begin painting or coloring the items however you wish. Use acrylic paint or magic markers for best results.
- Next, find a piece of flat cardboard for your base. This can be any size, it will your canvas.
- One by one, using liquid glue (or hot glue with the help of a family member), firmly stick the items you have decorated onto the piece of cardboard. Place the objects throughout your work of art, try to have some pieces sticking out or off of your board for some fun 3D art!
JULY 9:
Hello Process Art friends! We are excited to be back! Please enjoy our first Summer Process Art Workshop lesson with Ms. Eva!
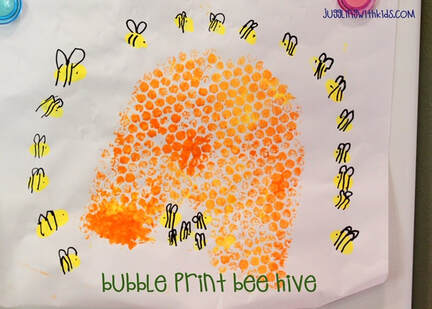
It’s summertime and the bees are out to play! Please listen to Please Please the Bees, written and illustrated by Gerald Kelley, to learn more about how hardworking and helpful bees are to us. You can find a link to the book here – https://www.youtube.com/watch?v=-XFQNGJmLEk.
Today we will be making beehive imprint paintings! You will need bubble wrap, acrylic paint (mainly yellow, gold, brown, and other hive colors you wish to use), paint brushes, and a large piece of white paper. If you do not have bubble wrap handy, I suggest using the bottom of egg cartons or an item that will leave circular imprints (such as plastic bottle caps).
Use the acrylic paint to cover your bubble wrap pieces. I suggest mixing or layering the colors for an ombre effect. If you are using bottle caps, dip the cap into some paint in order to fully cover the circle. If you are using egg cartons, paint the very bottom of the carton with a thick layer of paint – enough to leave an imprint on paper.
Next, carefully press the bubble wrap, bottle cap, or egg carton onto your piece of paper. After firmly holding the item down onto the paper, lift it up and see what fun imprints it has left on your paper. Repeat this process however many times you would like, or enough to fill your paper. You should start to see your beehive appear before your eyes!
For more fun, feel free to use paint, crayons, or markers (once your paper is dry) to draw some friendly bumblebees in your hives!
Enjoy! Please feel free to send us pictures of what you make, because at the end of this six week class, we'll showcase everyone's work in a Virtual Process Art Show!
Hello Process Art friends! We are excited to be back! Please enjoy our first Summer Process Art Workshop lesson with Ms. Eva!
It’s summertime and the bees are out to play! Please listen to Please Please the Bees, written and illustrated by Gerald Kelley, to learn more about how hardworking and helpful bees are to us. You can find a link to the book here – https://www.youtube.com/watch?v=-XFQNGJmLEk.
Today we will be making beehive imprint paintings! You will need bubble wrap, acrylic paint (mainly yellow, gold, brown, and other hive colors you wish to use), paint brushes, and a large piece of white paper. If you do not have bubble wrap handy, I suggest using the bottom of egg cartons or an item that will leave circular imprints (such as plastic bottle caps).
Use the acrylic paint to cover your bubble wrap pieces. I suggest mixing or layering the colors for an ombre effect. If you are using bottle caps, dip the cap into some paint in order to fully cover the circle. If you are using egg cartons, paint the very bottom of the carton with a thick layer of paint – enough to leave an imprint on paper.
Next, carefully press the bubble wrap, bottle cap, or egg carton onto your piece of paper. After firmly holding the item down onto the paper, lift it up and see what fun imprints it has left on your paper. Repeat this process however many times you would like, or enough to fill your paper. You should start to see your beehive appear before your eyes!
For more fun, feel free to use paint, crayons, or markers (once your paper is dry) to draw some friendly bumblebees in your hives!
Enjoy! Please feel free to send us pictures of what you make, because at the end of this six week class, we'll showcase everyone's work in a Virtual Process Art Show!
Bonus "Process Art" Lesson - Extra Yarn!
Link to Read Aloud: https://www.youtube.com/watch?v=JkanA4vIq0k
Please listen along to Extra Yarn and grab all your extra yarn or string and let’s have some fun! Since it’s springtime, we won’t be making sweaters like Annabelle – but we will be getting creative with yarn and string!
1. Collect some yarn, string, or even extra shoelace from around the house. You will also need washable paint and large paper for your masterpiece.
2. Dollop a few drops of paint onto the paper. It is artist’s choice as to where the drops land, what colors to use, and how many colors you would like to use.
3. Take a piece of string or yarn and pile it on top of your drops of paint. You can stack the yarn on top of a single drop of paint or lay it across the paper allowing the yarn to land in multiple paint globs.
4. Once the yarn is stuck in the paint, slowly drag the yarn across your paper. Let the paint smear across the paper, leaving trails and paths of paint.
5. Have fun with it! Get creative – see what patterns the yarn makes in the paint or what new shades of paint you can make from the colors mixing in the trails of paint.
|

|
Early Childhood Partners programs are funded by the Massachusetts Coordinated Family & Community Engagement (CFCE) grant awarded to Hamilton-Wenham Regional School District by the Massachusetts Department of Early Education and Care (EEC) serving Hamilton, Wenham, Manchester, and Essex. All educational and non-academic programs, activities and employment opportunities at Hamilton-Wenham RSD are offered without regard to race, color, sex, religion, national origin, ethnicity, sexual orientation, gender identity, homelessness, age and/or, disability, and any other class or characteristic protected by law.